 Debugger script
Dhtml css
The INPUT element allows you to create a variety of different input controls in forms. There are three basic input controls that you can create in a form: text boxes, radio buttons, and check boxes.
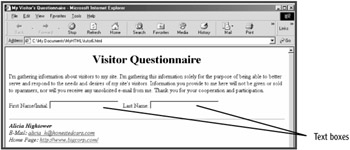
The input control you'll probably make the most use of when creating forms is the text box. If you've ever filled in an online form, you've almost certainly used text boxes. A text box provides a box of a specific size into which visitors type their information. For instance, you might specify a text box that is 25 characters in length into which visitors can type in their last names. For starters, create two text boxes into which visitors can type their first and last names (use spaces to space over, not tabs; see Figure 7.1):
<form method="post" action="/cgi-bin/FormSend.pl"> <p>First Name/Initial: <input type="text" name="First_Name" size="25">   Last Name: <input type="text" name="Last_Name" size="25"></p> </form>

The INPUT element's TYPE attribute defines the input control that is being created. In this case, type="text" specifies that the input control is a text box. The NAME attribute provides each text box with a unique name, which is sent along with the data to identify it, when the data is submitted.
NAME attribute values must begin with a letter (a to z or A to Z) and can include only letters, digits (0–9), hyphens (-), underscores (_), colons (:), and periods (.). Spaces are not allowed in NAME attribute values.
The SIZE attribute specifies the length of the text box in characters (but not the limit in characters that can be input). Note that two non-breaking space characters ( ) are inserted to create extra separation between text boxes displayed on the same line. Although not included in this example, the MAXLENGTH attribute can be used to limit the amount of text that can be input in a text box. To limit the amount of characters that can be input to the length of the text box, just set the same value for the MAXLENGTH and SIZE attributes.
Go ahead and add some more text boxes to your form (see Figure 7.2):
<p>First Name/Initial: <input type="text" name="First_Name" size="25">  Last Name: <input type="text" name="Last_Name" size="25"></p> <p>City: <input type="text" name="City" size="25">   State/Province: <input type="text" name="State" size="15">   Zip/Mail Code: <input type="text" name="Zip" size="15"></p> <p>Country: <input type="text" name="Country" size="25">   Web Address: <input type="text" name="Web_Address" size="40"></p> </form>
Sometimes you want a text box to be already filled out with a default value. You use the VALUE attribute to set a default value for a text box. Go ahead and edit the "Country" text box and set "USA" as the default value (see Figure 7.3):
<p>Country: <input type="text" name="Country" size="25" value="USA">  
 Debugger script
Dhtml css