 Ajax toolkit
Ajax tutorials
2.1. SQL Server Management StudioSQL Server Management Studio is an integrated environment for accessing, configuring, managing, and administering SQL Server and for developing SQL Server objects. Management Studio works with all SQL Server components, including Report Services, Data Transformation Services, SQL Server Mobile, and Notification Services.
Launch SQL Server Management Studio by selecting Start SQL Server Management Studio displays two panes by default:
These and other windows can be added using the View menu. The various windows are described in the following subsections. Figure 2-1. SQL Server Management Studio 2.1.1. Registered ServersThe Registered Servers window lists servers that you have previously registered, optionally organized into server groupsa hierarchical structure used to help manage registered servers. A registered server preserves connection information and lets you easily determine whether the servers are running, access Object Explorer and Query Editor for the servers, and provide user-friendly names together with detailed descriptions for the servers. The toolbar below the main menu lets you switch between the five types of registered servers that you can manage (listed in order from left to right):
You can also switch the type of registered server by using the View The Registered Servers context menu has the options described in Table 2-1.
2.1.2. Object ExplorerObject Explorer connects to Database Engine, Analysis Services, Integration Services, Reporting Services, and SQL Server Mobile instances. It organizes all objects on the database instance into a tree hierarchy and lets you manage them. Object Explorer is visible by default. Select View The toolbar at the top of the Object Explorer window has five buttons (described from left to right):
Only one item can be selected at a time in the Object Explorer tree view. The Summary Page lets you select multiple items and perform actions on the selected group. Open the Summary Page by selecting View To hide system objects in Object Explorer, select Tools The following subsections describe the types of nodes in Object Explorer and the activities that you can perform at each type of node. 2.1.2.1. Database server instanceThe database server instance represents a SQL Server installation. The context menu for the database server instance lets you connect to and disconnect from a server, register a new server, create a query, manage the SQL Server service for the instance, refresh the tree hierarchy, and manage the properties for the server. 2.1.2.2. Databases nodeThe Databases node contains system databases, database snapshots, and user databases. Database snapshots are new in SQL Server 2005 and let you create a read-only static view of a database. Create a snapshot by using the CREATE DATABASE T-SQL statement with the AS SNAPSHOT clause. Figure 2-4 shows the hierarchy of objects under the Databases node. From the Databases node you can create a new database, attach a database by selecting its database files, or restore a database, file, or file group. You can create a query from a named database node. Right-click on the database node and select New Query from the context menu to launch Query Editor
. Query Editor opens a code pane in which you can enter T-SQL statements. After you execute the statement by selecting Query
Query Editor is shown in Figure 2-5. Query Designer
is a visual tool that lets you design SELECT, INSERT, UPDATE, and DELETE DML statements. After you open Query Editor, you can launch Query Designer either by selecting Query You can create the query by using the three panes at the same time. Right-click in the diagram area (top pane) to open a context menu that lets you change the query type, add tables, and change the grouping of results. Relationships are created automatically if they exist in the database. You can also drag one or more columns from one table to another to create relationships between tables. Select columns to display in the query by using the checkboxes next to the column names. Once you have completed the query design, click the OK button to transfer the generated T-SQL to Query Editor, where you can execute the query. Select the T-SQL in Query Editor, open Query Designer, and the selected T-SQL will be parsed automatically into a diagram. Figure 2-4. Object Explorer Databases node hierarchy Figure 2-5. Query Editor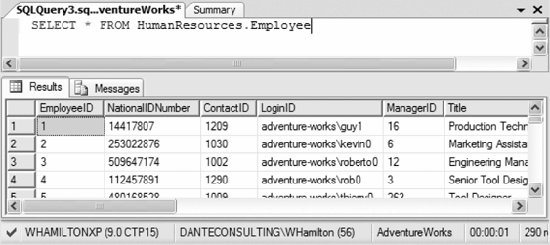 Figure 2-6. Query Designer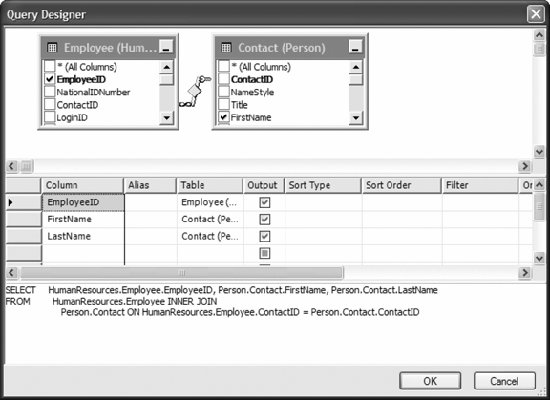 You can create database diagrams from the Database Diagrams node (refer to Figure 2-4). Select New Database Diagram from the context menu to launch Database Diagram Designer, a visual tool that lets you create, edit, and delete tables, columns, indexes, constraints, and relationships. You can automatically create one or more diagrams for an existing databaseSQL Server keeps diagrams synchronized with the database. Figure 2-7 shows part of a database diagram for the AdventureWorks database.
Figure 2-7. Database Diagram Designer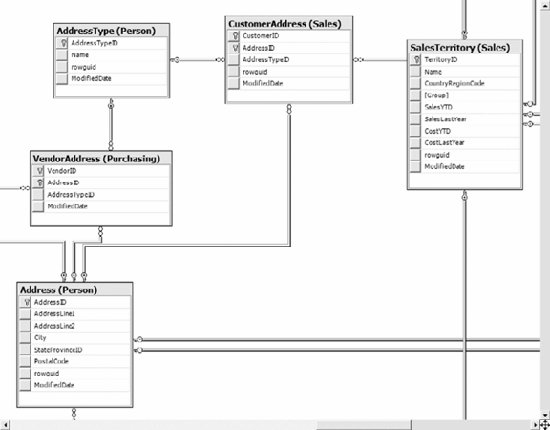 You can also create a new table or edit an existing table by using Table Designer . Select New Table or Modify, respectively, from the Table context menu. Table Designer has two panes. The upper pane is a grid in which each row describes a column in the table. The lower pane shows additional column properties for the column selected in the upper grid. Figure 2-8 shows Table Designer for the Person.Contact table in the AdventureWorks database. You can use Table Designer to modify indexes, constraints, and relationships by selecting the appropriate option from the context menu. Figure 2-8. Table Designer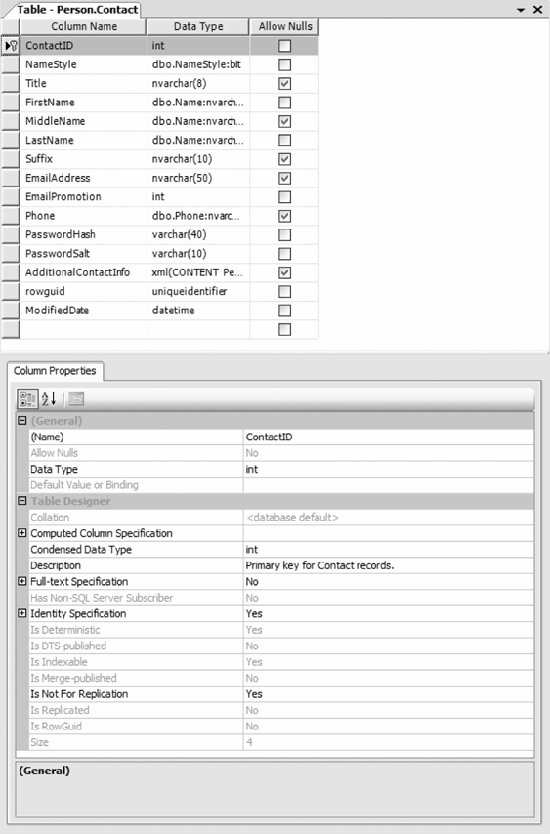 You can view and modify data in the table by selecting Open Table from the table's context menu. This brings up a data grid for the table. Figure 2-9 shows the data grid for the Person.Contact table in the AdventureWorks database. Figure 2-9. Table data viewer and editor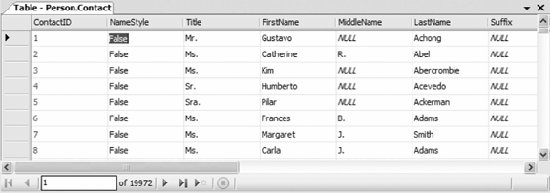 Other nodes in the Databases hierarchy allow you to create, manage, and drop the objects within the node as well as perform other object-specific tasks. 2.1.2.3. Security nodeThe Security node lets you manage server logins, server roles, and credentials. Figure 2-10 shows the hierarchy of objects under the Security node. Figure 2-10. Object Explorer Security node hierarchy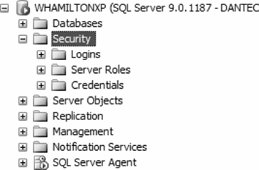 2.1.2.4. Server Objects nodeThe Server Objects node lets you manage backup devices, endpoints, linked servers, and server DDL triggers. Figure 2-11 shows the hierarchy of objects under the Server Objects node. Figure 2-11. Object Explorer Server Objects node hierarchy 2.1.2.5. Replication nodeThe Replication node lets you manage local publications and subscriptions. Figure 2-12 shows the hierarchy of objects under the Replication node. Figure 2-12. Object Explorer Replication node hierarchy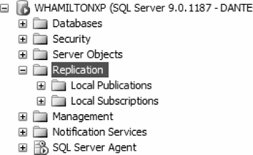 2.1.2.6. Management nodeThe Management node lets you manage maintenance plans, server logs, Database Mail, the Distributed Transaction Coordinator, Full-Text Search, and legacy objects. It also provides access to Activity Monitor, which provides information about processes and locks. Figure 2-13 shows the hierarchy of objects under the Management node. 2.1.2.7. Notification Services nodeThe Notification Services node lets you manage Notification Services instances. 2.1.2.8. SQL Server Agent nodeThe SQL Server Agent node lets you manage jobs, alerts, operators, and proxies and provides access to SQL Server Agent error logs and the SQL Server Agent Job Activity Monitor. Figure 2-14 shows the hierarchy of objects under the SQL Server Agent node. Figure 2-13. Object Explorer Management node hierarchy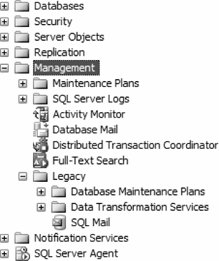 Figure 2-14. Object Explorer SQL Server Agent node hierarchy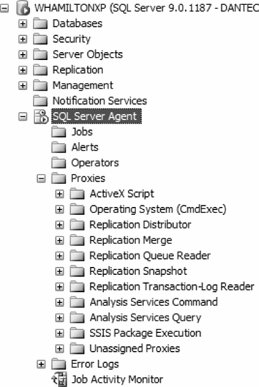 2.1.3. Template ExplorerScript templates contain T-SQL statements for performing a variety of common tasks. Open Template Explorer by selecting View Figure 2-15. Template Explorer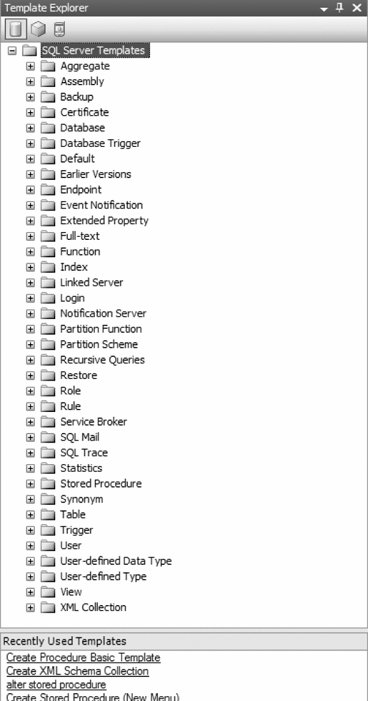 Template Explorer uses a tree structure to organize templates into folders. The bottom of the window saves a list of recently used templates. The toolbar at the top of the Template Explorer window has three buttons that let you select templates for Database Engine, Analysis Server, or SQL Server Mobile, respectively. Templates are parameterized to help you customize the code. Parameter definitions follow the format <parameter_name,data_type,value>, with values as follows:
The create database template (from the Database folder) follows:
    -- =============================================
    -- Create database template
    -- =============================================
    USE master
    GO

    -- Drop the database if it already exists
    IF  EXISTS (
        SELECT name
            FROM sys.databases
            WHERE name = N'<Database_Name, sysname, Database_Name>'
    )
    DROP DATABASE <Database_Name, sysname, Database_Name>
    GO

    CREATE DATABASE <Database_Name, sysname, Database_Name>
    GO
This script has a single parameter, <Database_Name, sysname, Database_Name>. To replace the parameter, select Query Figure 2-16. Specify Values for Template Parameters dialog box Replace the value of the Database_Name parameter with the value ProgrammingSqlServer2005 and click the OK button. The script is updated for the parameter value as follows:
    -- =============================================
    -- Create database template
    -- =============================================
    USE master
    GO

    -- Drop the database if it already exists
    IF  EXISTS (
        SELECT name
            FROM sys.databases
            WHERE name = N'ProgrammingSqlServer2005'
    )
    DROP DATABASE ProgrammingSqlServer2005
    GO

    CREATE DATABASE ProgrammingSqlServer2005
    GO
Note that once you set a parameter value, it is permanently replaced and can no longer be accessed. You can create custom templates in Template Explorer, as well. Follow these steps:
2.1.4. Solution ExplorerThe Solution Explorer window of SQL Server Management Studio lets you view and manage items associated with a script project. Open Solution Explorer by selecting View SQL Server Management Studio lets you create three types of projectsSQL Server Scripts, Analysis Services Scripts, and SQL Server Mobile Scripts. You can group multiple projects into a solution. A project contains itemsconnection information, queries, scripts (sets of T-SQL statements stored in a file), and miscellaneous files relevant to the project. Solution Explorer lets you open each item in an appropriate editor. The property window located by default in the window below the Solution Explorer window lets you view and manage item properties. |
 Ajax toolkit
Ajax tutorials