 Ajax toolkit
Ajax tutorials
19.1. Programming ReplicationSQL Server Replication Management Objects (RMO) is a collection of namespaces introduced in SQL Server 2005 for programming all aspects of SQL Server 2005 replication. RMO supersedes replication functionality in SQL-DMO. RMO is compatible with SQL Server 2000 and SQL Server 7.0, which lets you manage replication in environments having a mix of different SQL Server versions. The following subsections provide examples that show how to use the replication classes and include descriptions of the classes. The examples use merge replication, but transactional replication is similar. You need a reference to the following assemblies to compile and run the examples:
Additional assembly references are indicated for examples in which they are required. The ReplicationServer object described in is the top-level class in the RMO class hierarchy. It represents a SQL Server instance involved in replication. The server can take the role of distributor, publisher, subscriber, or a combination of those roles. 19.1.1. PrerequisitesMost of the examples in this chapter build on each other. There are a few things you need to do before you start. Disable replication if it is enabled. This will let you run the first two examples, which install a distributor and create a publisher. To disable replication, right-click the Replication node in Object Explorer in SQL Server Management Studio, select Disable Replication from the context menu, and follow the instructions in the wizard. Create a database named ReplicationDestination by right-clicking the Databases node in Object Explorer and selecting New Database from the context menu. In the New Database dialog box, set the Database name listbox to ReplicationDestination, accept the defaults, and click OK to create the database. Ensure that the setup is correct by following these steps:
The context menu should appear as shown in Figure 19-1. You should also see the new ReplicationDestination database. 19.1.2. Installing a DistributorThis example shows how to install a distributor onto the local SQL Server instance. It instantiates a ServerConnection object representing the local machine, and then creates a ReplicationServer object based on this ServerConnection object. The next object created is a DistributionDatabase object, called distribution and linked to the ServerConnection object named sc. A distribution database stores replication information on the distributor. Finally, the InstallDistributor( ) method of the ReplicationServer class installs a distributor onto the currently connected or remote SQL Server instance. The distribution database is created as a system database. The password for the InstallDistributor( ) method must conform to your password policy. The source code for the example follows:
    using System;

    using Microsoft.SqlServer.Management.Common;
    using Microsoft.SqlServer.Replication;
Figure 19-1. Prerequisite configuration
    class Program
    {
        static void Main(string[] args)
        {
            ServerConnection sc = new ServerConnection("localhost");
            // create the distributor
            ReplicationServer dist = new ReplicationServer(sc);

            // install the distributor
            DistributionDatabase dDb = new DistributionDatabase(
                "distribution", sc);
            dist.InstallDistributor("password1", dDb);

            sc.Disconnect(  );

            Console.WriteLine("Press any key to continue.");
            Console.ReadKey(  );
        }
    }
Once you have executed the example, confirm that the distributor has been installed by right-clicking the Replication node in Object Explorer. The context menu should appear as shown in Figure 19-2. The Configure Distribution context menu item is replaced by two new menu itemsDistributor Properties and Disable Publishing and Distribution. Figure 19-2. Replication context menu after installing a distributor You can see the new distribution database in Object Explorer in SQL Server Management Studio by right-clicking the Replication node and selecting Distributor Properties from the context menu. The distributor properties are displayed in the Distributor Properties dialog box, shown in Figure 19-3. The RMO classes used to programmatically manage distribution and distributor objects are described in Table 19-1.
19.1.3. Creating a PublisherThis example creates a publisher on the local SQL Server instance. The example instantiates a DistributionPublisher object and associates it with the target ServerConnection object. The DistributionPublisher class represents a computer that acts as both a publisher and a distributor. Figure 19-3. Distributor Properties dialog box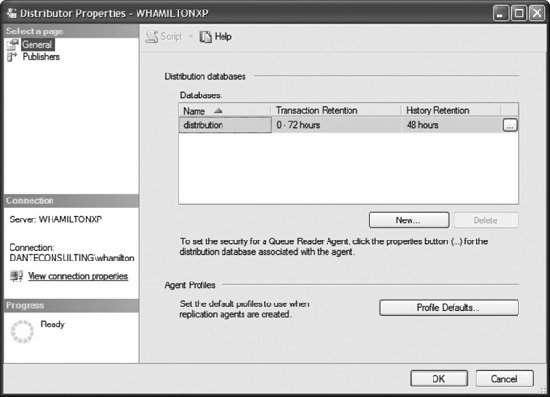 Next, several properties of the DistributionPublisher object are set, and then its Create( ) method is called. The DistributionDatabase property links this DistributionPublisher object with the DistributionDatabase object you created in the previous example. The PublisherSecurity property accesses the security context as a ConnectionSecurityContext object. It is used by the replicating agent to connect to the distribution publisher. The ConnectionSecurityContext object specifies an authentication mode and, if SQL Server authentication is used, the login and password. This example uses Windows authentication.
The source code for the example follows:
    using System;

    using Microsoft.SqlServer.Management.Common;
    using Microsoft.SqlServer.Replication;

    class Program
    {
        static void Main(string[] args)
        {
            ServerConnection sc = new ServerConnection("(local)");

            DistributionPublisher dp = new DistributionPublisher(
                "ServerName", sc);
            dp.DistributionDatabase = "distribution";
            dp.WorkingDirectory = @"C:\PSS2005\Replication
";
            dp.PublisherSecurity.WindowsAuthentication = true;
            dp.Create(  );

            sc.Disconnect(  );

            Console.WriteLine("Press any key to continue.");
            Console.ReadKey(  );
        }
    }
Once you have executed the example, confirm that the publisher has been created by right-clicking the Replication node in Object Explorer. The context menu should appear as shown in Figure 19-4. A new context item, Publisher Properties, has been added. Figure 19-4. Replication context menu after creating a publisher The RMO classes used to manage publishers programmatically are described in Table 19-2.
As mentioned earlier in the section, the PublisherSecurity property of the PublisherSubscriber class accesses the security context as a ConnectionSecurityContext object that is used by the replicating agent to connect to the distribution publisher. The RMO class used to programmatically manage security context information is described in Table 19-3.
19.1.4. Enabling a Database for PublicationThis example enables the AdventureWorks database for merge publication. It does so by creating a ReplicationDatabase object and associating it with the AdventureWorks database. ReplicationDatabase represents a replication database, either a publisher or a subscriber. The EnableMergePublishing and EnableTransPublishing properties of the ReplicationDatabase class control whether a database is available for merge and transactional replication publication. The source code for the example follows:
    using System;

    using Microsoft.SqlServer.Management.Common;
    using Microsoft.SqlServer.Replication;

    class Program
    {
        static void Main(string[] args)
        {
            ServerConnection sc = new ServerConnection("localhost");

            ReplicationDatabase rDb = new ReplicationDatabase(
                "AdventureWorks", sc);
            rDb.EnabledMergePublishing = true;

            sc.Disconnect(  );

            Console.WriteLine("Press any key to continue.");
            Console.ReadKey(  );
        }
    }
After you run the code, confirm that the AdventureWorks database is enabled for merge publication by selecting Replication 19.1.5. Creating a PublicationThis example creates a merge publication named AdventureWorks_MergePub for the AdventureWorks database. It does so by instantiating a MergePublication object and then setting its Name, DatabaseName, ConnectionContext, and Status properties. Finally, it invokes its Create( ) method. The source code for the example follows:
    using System;

    using Microsoft.SqlServer.Management.Common;
    using Microsoft.SqlServer.Replication;

    class Program
    {
        static void Main(string[] args)
        {
            ServerConnection sc = new ServerConnection("localhost");

            MergePublication mp = new MergePublication(  );
            mp.Name = "AdventureWorks_MergePub";
            mp.DatabaseName = "AdventureWorks";
            mp.ConnectionContext = sc;
Figure 19-5. Publisher Properties dialog box showing AdventureWorks database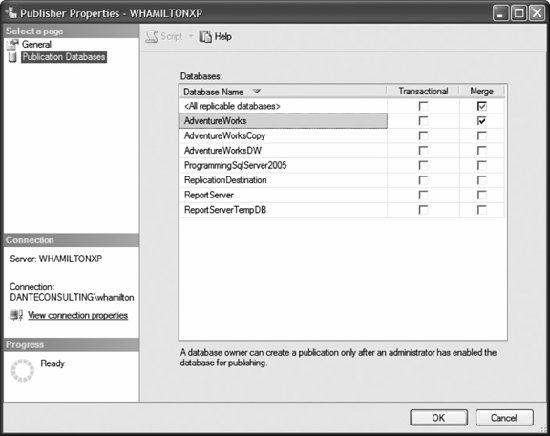
            mp.Status = State.Active;
            mp.Create(  );

            sc.Disconnect(  );

            Console.WriteLine("Press any key to continue.");
            Console.ReadKey(  );
        }
    }
After executing this example, you can view the new publication in Object Explorer by refreshing and expanding the Replication
The RMO classes used to manage publications are described in Table 19-4. Figure 19-6. Results for creating a publication example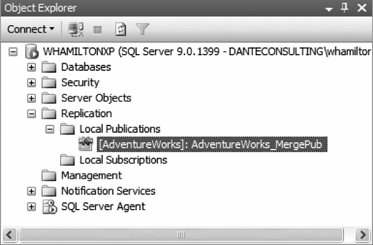
19.1.6. Creating an ArticleThis example creates an article named Article_1 in the AdventureWorks_MergePub merge publication created in the preceding section, "Creating a Publication." The steps are the same as you've seen previously:
The properties of interest for a MergeArticle object are as follows:
The source code for the example follows:
    using System;

    using Microsoft.SqlServer.Management.Common;
    using Microsoft.SqlServer.Replication;

    class Program
    {
        static void Main(string[] args)
        {
            ServerConnection sc = new ServerConnection("localhost");

            MergeArticle ma = new MergeArticle(  );
            ma.Name = "Article_1";
            ma.PublicationName = "AdventureWorks_MergePub";
            ma.DatabaseName = "AdventureWorks";
            ma.ConnectionContext = sc;
            ma.SourceObjectName = "Vendor";
            ma.SourceObjectOwner = "Purchasing";
            ma.Create(  );

            sc.Disconnect(  );

            Console.WriteLine("Press any key to continue.");
            Console.ReadKey(  );
        }
    }
After running the code, you can see the publication by right-clicking the Replication Figure 19-7. Results for creating an article example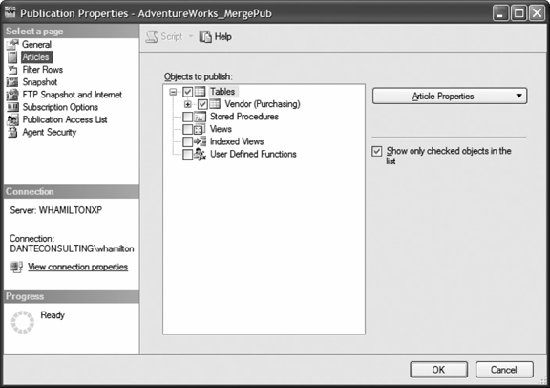 The RMO classes used to manage publications are described in Table 19-5.
19.1.7. Enumerating Items Available for ReplicationThis example enumerates the tables and columns available for replication in the AdventureWorks database. It does so using the EnumReplicationTables( ) method on the ReplicationDatabase class. This method returns an ArrayList object of ReplicationTable objects. The example then scans this ArrayList object and calls the EnumReplicationColumns( ) method for each ReplicationTable object. For each column reported, the example displays the column's name and data type. The source code for the example follows:
    using System;
    using System.Collections;

    using Microsoft.SqlServer.Management.Common;
    using Microsoft.SqlServer.Replication;

    class Program
    {
        static void Main(string[] args)
        {
            ServerConnection sc = new ServerConnection("localhost");
            ReplicationDatabase rDb = new ReplicationDatabase(
                "AdventureWorks", sc);

            ArrayList ta = rDb.EnumReplicationTables(  );
            for (int i = 0; i < ta.Count; i++)
            {
                ReplicationTable t = (ReplicationTable)ta[i];
                Console.WriteLine(t.OwnerName + "." + t.Name);

                ArrayList ca = t.EnumReplicationColumns(  );
                for (int j = 0; j < ca.Count; j++)
                {
                    ReplicationColumn c = (ReplicationColumn)ca[j];
                    Console.WriteLine("  " + c.Name + " " + c.Datatype);
                }

                Console.WriteLine(Environment.NewLine);
            }

            sc.Disconnect(  );

            Console.WriteLine("Press any key to continue.");
            Console.ReadKey(  );
        }
    }
Partial results are show in Figure 19-8. Figure 19-8. Results for enumerating items available for replication example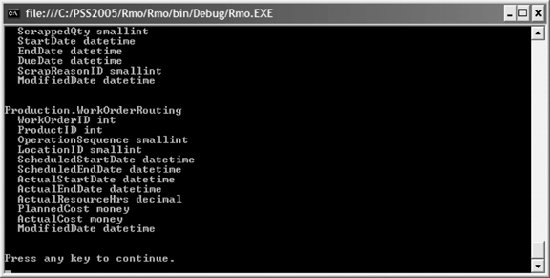 The RMO classes used to manage replication items are described in Table 19-6.
19.1.8. Filtering an ArticleThis example partitions the article created in the "Creating an Article" section earlier in this chapter both horizontally (row-based) and vertically (column-based). It does so by using the MergeArticle class, which exposes one property and two methods of interest. The FilterClause property of the MergeArticle class defines subsets of rows that are available for the article, similar to horizontally partitioning the data. The syntax of the filter clause follows that of a T-SQL WHERE clause without the word WHERE. In this example, the full WHERE clause is WHERE CreditRating = 1 AND PreferredVendorStatus = 'true'. Only records matching this criterion will be published. The AddReplicatedColumns( ) and RemoveReplicatedColumns( ) methods add columns to and remove columns from the article, similar to vertically partitioning the data. Only columns that are nullable or defined with a default value can be removed from a vertical partition. This example removes the PurchasingWebServiceURL column from the article. The source code for the example follows:
    using System;

    using Microsoft.SqlServer.Management.Common;
    using Microsoft.SqlServer.Replication;

    class Program
    {
        static void Main(string[] args)
        {
            ServerConnection sc = new ServerConnection("localhost");
            ReplicationDatabase rDb = new ReplicationDatabase(
                "AdventureWorks", sc);

            MergeArticle ma = rDb.MergePublications["AdventureWorks_MergePub"].
                MergeArticles
["Article_1"];
            ma.FilterClause = "CreditRating = 1 AND PreferredVendorStatus = 'true'";
            ma.RemoveReplicatedColumns(new string[] {"PurchasingWebServiceURL"});

            sc.Disconnect(  );

            Console.WriteLine("Press any key to continue.");
            Console.ReadKey(  );
        }
    }
You can examine the article by right-clicking the Replication Figure 19-9. Publication Properties dialog box You can examine the filter you added by selecting the Filter Rows page in the Publication Properties dialog box, selecting the Vendor (Purchasing) filtered tables, and clicking the Edit button to open the Edit Filter dialog box, as shown in Figure 19-10. 19.1.9. Registering a SubscriberThis example creates a subscriber named Subscriber_1. It does so by using the RegisteredSubscriber class in a very simple manner:
The source code for the example follows:
    using System;

    using Microsoft.SqlServer.Management.Common;
Figure 19-10. Edit Filter dialog box
    using Microsoft.SqlServer.Replication;

    class Program
    {
        static void Main(string[] args)
        {
            ServerConnection sc = new ServerConnection("localhost");

            RegisteredSubscriber rs = new RegisteredSubscriber("Subscriber_1", sc);
            rs.Create(  );

            sc.Disconnect(  );

            Console.WriteLine("Press any key to continue.");
            Console.ReadKey(  );
        }
    }
The RMO classes used to manage subscribers are provided for backward compatibility, as it is no longer necessary to explicitly register a subscriber at the publisher in SQL Server 2005. These classes are described in Table 19-7.
19.1.10. Creating a SubscriptionThis example creates a pull merge subscription for the publication AdventureWorks_MergePub created in the section "Creating a Publication," earlier in this chapter. It does so in the usual manner, but with one additional method call:
The properties that the example sets are as follows:
There are two additional steps you must perform:
These are the steps to configure the MergePublication object (AdventureWorks_MergePub) to allow pull, and to register the subscription:
The source code for the example follows:
    using System;

    using Microsoft.SqlServer.Management.Common;
    using Microsoft.SqlServer.Replication;

    class Program
    {
        static void Main(string[] args)
        {
            ServerConnection sc = new ServerConnection("localhost");

            // create the pull subscription
            MergePullSubscription mps = new MergePullSubscription(  );
            mps.ConnectionContext = sc;
            mps.PublisherName = "ServerName";
            mps.PublicationDBName = "AdventureWorks";
            mps.PublicationName = "AdventureWorks_MergePub";
            mps.DatabaseName = "ReplicationDestination";
            mps.SubscriberType = MergeSubscriberType.Local;
            mps.CreateSyncAgentByDefault = true;
            mps.Create(  );

            MergePublication mp = new MergePublication(
                "AdventureWorks_MergePub", "AdventureWorks", sc);
            mp.LoadProperties(  );

            // allow pull if not already allowed
            if ((mp.Attributes & PublicationAttributes.AllowPull) == 0)
            {
                mp.Attributes = mp.Attributes | PublicationAttributes.AllowPull;
                mp.CommitPropertyChanges(  );
                mp.Refresh(  );
            }

            // register the merge pull subscription at the publisher
            mp.MakePullSubscriptionWellKnown(
                "ServerName", "ReplicationDestination",
                mps.SyncType, mps.SubscriberType, mps.Priority);

            sc.Disconnect(  );

            Console.WriteLine("Press any key to continue.");
            Console.ReadKey(  );
        }
    }
To examine the subscription, refresh and expand the Replication Setting the CreateSyncAgentByDefault property of the MergePullSubscription class creates the agent job used to synchronize the subscription. Open the SQL Server Agent jobs by selecting SQL Server Agent The RMO classes used to manage subscriptions are described in Table 19-8.
19.1.11. Generating the Initial SnapshotThis example generates the initial snapshot used to initialize the subscriber for a new subscription. It uses the SnapshotGenerationAgent class, which represents the Snapshot Agent. It creates an instance of this class, and then sets the following properties:
The last step is to call the GenerateSnapshot( ) method of the SnapshotGenerationAgent. In this case, GenerateSnapshot( ) runs the Snapshot Agent synchronously to generate the initial snapshot for the merge publication named AdventureWorks_MergePub.
The source code for the example follows:
    using System;

    using Microsoft.SqlServer.Management.Common;
    using Microsoft.SqlServer.Replication;

    class Program
    {
        static void Main(string[] args)
        {
            SnapshotGenerationAgent sga = new SnapshotGenerationAgent(  );
            sga.Publisher = "ServerName";
            sga.PublisherDatabase = "AdventureWorks";
            sga.Publication = "AdventureWorks_MergePub";
            sga.Distributor = "ServerName";
            sga.PublisherSecurityMode = SecurityMode.Integrated;
            sga.DistributorSecurityMode = SecurityMode.Integrated;
            sga.ReplicationType = ReplicationType.Merge;
            sga.GenerateSnapshot(  );

            Console.WriteLine(Environment.NewLine + "Press any key to continue.");
            Console.ReadKey(  );
        }
    }
Partial results are shown in Figure 19-12. The StartSnapshotGenerationAgentJob( ) method of the MergePublication and transPublication classes generates a snapshot asynchronously. 19.1.12. Synchronizing a Subscription to an Initial SnapshotThis example uses the snapshot created in the preceding section, "Generating the Initial Snapshot," to initialize the subscriber when the data is first synchronized.
Figure 19-12. Partial results for generating initial snapshot example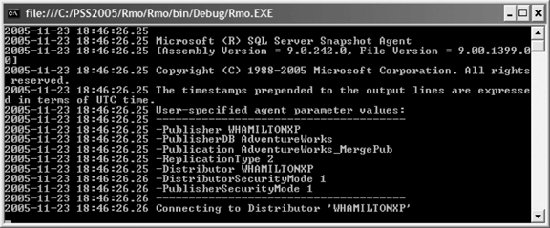 The source code for the example follows:
    using System;

    using Microsoft.SqlServer.Management.Common;
    using Microsoft.SqlServer.Replication;

    class Program
    {
        static void Main(string[] args)
        {
            ServerConnection sc = new ServerConnection("localhost");

            MergePullSubscription mps = new MergePullSubscription(  );
            mps.ConnectionContext = sc;
            mps.DatabaseName = "ReplicationDestination";
            mps.PublisherName = "ServerName";
            mps.PublicationDBName = "AdventureWorks";
            mps.PublicationName = "AdventureWorks_MergePub";
            mps.LoadProperties(  );
            mps.SynchronizeWithJob(  );

            sc.Disconnect(  );

            Console.WriteLine("Press any key to continue.");
            Console.ReadKey(  );
        }
    }
After you run this code, the table named Vendor is created in the subscriber database ReplicationDestination. The SynchronizeWithJob( ) method of the MergeSubscription, MergePullSubscription, transSubscription, and TRansPullSubscription classes starts the Merge Agent job to synchronize the subscription. The snapshot is transferred to and applied to the subscriber when the subscription is first synchronized. If you select View Synchronization Status from the context menu for the local subscription, the status of the last synchronization indicates something similar to the following:
    Applied the snapshot and merged 0 data change(s) (0 insert(s), 0 update(s),
    0 delete(s), 0 conflict(s)).
If you run the code a second time, the snapshot is not applied and the status of the last synchronization indicates something similar to this:
Merge completed with no data changes processed.
Replication allows multiple nodes to make data changes, so it is possible that changes made at one node may conflict with changes made at another. The RMO classes used to manage merge and transactional replication conflict information are described in Table 19-9.
19.1.13. Retrieving Agent HistoryThis example displays status information about the last synchronization job that was run. It uses the LastAgentJobHistoryInfo( ) method of the MergePullSubscription class, which returns this information as an AgentJobHistoryInfo object. This class represents the results from the last run of the replication agent. It then shows the LastRunDateTime and Status properties of this object.
The source code for the example follows:
    using System;

    using Microsoft.SqlServer.Management.Common;
    using Microsoft.SqlServer.Replication;

    class Program
    {
        static void Main(string[] args)
        {
            ServerConnection sc = new ServerConnection("localhost");

            MergePullSubscription mps = new MergePullSubscription(  );
            mps.ConnectionContext = sc;
            mps.DatabaseName = "ReplicationDestination";
            mps.PublisherName = "ServerName";
            mps.PublicationDBName = "AdventureWorks";
            mps.PublicationName = "AdventureWorks_MergePub";
            mps.LoadProperties(  );

            AgentJobHistoryInfo ajhi = mps.LastAgentJobHistoryInfo(  );
            Console.WriteLine("Last Run Date/Time: " + ajhi.LastRunDateTime);
            Console.WriteLine("Status:             " + ajhi.Status);

            sc.Disconnect(  );

            Console.WriteLine(Environment.NewLine + "Press any key to continue.");
            Console.ReadKey(  );
        }
    }
Results are shown in Figure 19-13. Figure 19-13. Results for retrieving agent history example The RMO classes used to manage agents are described in Table 19-10. 19.1.14. Specifying a Replication ScheduleThis example sets the subscription created in the "Creating a Subscription" section to pull replication data from the publication every five minutes. It does so by setting several properties of the MergePullSubscription object:
The last step is to call the CommitPropertyChanges( ) method on the MergePull-Subscription object.
The source code for the example follows:
    using System;

    using Microsoft.SqlServer.Management.Common;
    using Microsoft.SqlServer.Replication;

    class Program
    {
        static void Main(string[] args)
        {
            ServerConnection sc = new ServerConnection("localhost");

            MergePullSubscription mps = new MergePullSubscription(  );
            mps.ConnectionContext = sc;
            mps.DatabaseName = "ReplicationDestination";
            mps.PublisherName = "ServerName";
            mps.PublicationDBName = "AdventureWorks";
            mps.PublicationName = "AdventureWorks_MergePub";
            mps.LoadProperties(  );
            mps.AgentSchedule.FrequencyType = ScheduleFrequencyType.Daily;
            mps.AgentSchedule.FrequencySubDay = ScheduleFrequencySubDay.Hour;
            mps.AgentSchedule.FrequencySubDayInterval = 1;
            mps.CommitPropertyChanges(  );

            sc.Disconnect(  );

            Console.WriteLine("Press any key to continue.");
            Console.ReadKey(  );
        }
    }
After you execute the example, confirm the new job schedule in Object Explorer by refreshing SQL Server Agent Figure 19-14. Job Properties dialog box Select the Schedules page and then click the Edit button to display the Job Schedules Properties dialog box, shown in Figure 19-15. Figure 19-15. Job Schedule Properties dialog box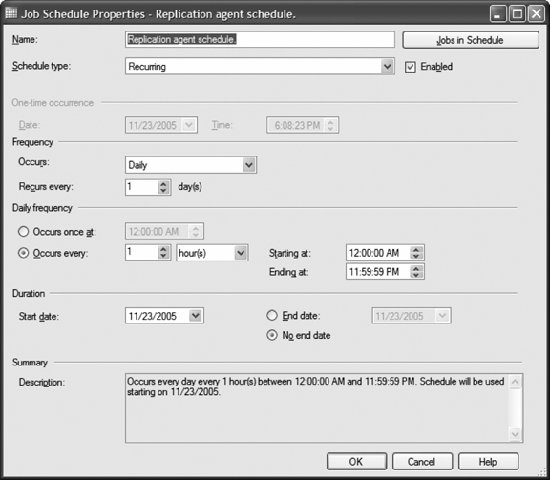 The RMO classes used to manage replication agents are described in Table 19-11.
19.1.15. Validating Subscriber DataThis example validates the subscription to the AdventureWorks_MergePub publication created in the earlier "Creating a Publication" section. It first calls the Validate-Subscription( ) method of the MergePublication class, which marks the subscription for validation in the next synchronization. It then forces synchronization by calling MergePullSubscription.SynchronizeWithJob( ).
The source code for the example follows:
    using System;

    using Microsoft.SqlServer.Management.Common;
    using Microsoft.SqlServer.Replication;

    class Program
    {
        static void Main(string[] args)
        {
            ServerConnection sc = new ServerConnection("localhost");

            // mark the subscription for validation
            MergePublication mp = new MergePublication(  );
            mp.ConnectionContext = sc;
            mp.Name = "AdventureWorks_MergePub";
            mp.DatabaseName = "AdventureWorks";
            mp.LoadProperties(  );
            mp.ValidateSubscription("ServerName", "ReplicationDestination",
                ValidationOption.Checksum80);

            // synchronize the subscription.
            MergePullSubscription mps = new MergePullSubscription(  );
            mps.ConnectionContext = sc;
            mps.DatabaseName = "ReplicationDestination";
            mps.PublisherName = "ServerName";
            mps.PublicationDBName = "AdventureWorks";
            mps.PublicationName = "AdventureWorks_MergePub";
            mps.LoadProperties(  );
            mps.SynchronizeWithJob(  );

            sc.Disconnect(  );

            Console.WriteLine("Press any key to continue.");
            Console.ReadKey(  );
        }
    }
The ValidateSubscription( ) method of the MergePublication class marks the subscription for validation in the next synchronization. To view the subscription, refresh and expand the Replication Figure 19-16. Log File Viewer dialog box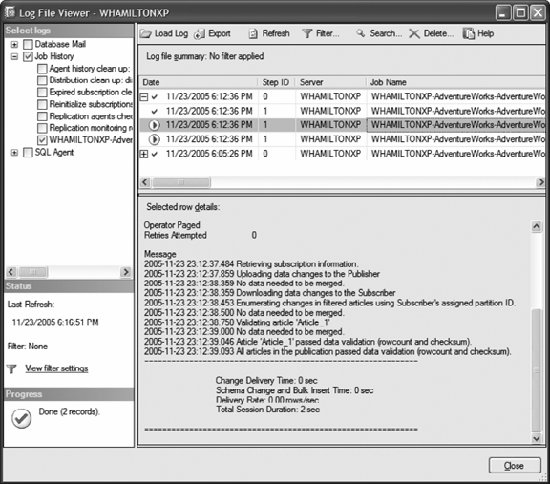 19.1.16. Monitoring ReplicationThis example displays summary and detailed merge session information using three classes:
The example shows the StartTime, Duration, and Status properties of each MergeSessionSummary object. It also obtains details about each step by calling MergeSubscriberMonitor.GetSessionDetails( ), and displays the DetailType and Message properties.
The source code for the example follows:
    using System;

    using Microsoft.SqlServer.Management.Common;
    using Microsoft.SqlServer.Replication;

    class Program
    {
        static void Main(string[] args)
        {
            ServerConnection sc = new ServerConnection("localhost");
            MergeSubscriberMonitor msm = new MergeSubscriberMonitor(sc);
            msm.Publisher = "ServerName";
            msm.Publication = "AdventureWorks_MergePub";
            msm.PublisherDB = "AdventureWorks";
            msm.SubscriberDB = "ReplicationDestination";

            // display the merge session summary information
            MergeSessionSummary[] mssa = msm.GetSessionsSummary(  );
            foreach (MergeSessionSummary mss in mssa)
            {
                Console.WriteLine(mss.StartTime + ", " + mss.Duration + ", " +
                    mss.Status);

                // display the merge session detail information for the session
                MergeSessionDetail[] msda = msm.GetSessionDetails(mssa[0].SessionId);
                foreach (MergeSessionDetail msd in msda)
                    Console.WriteLine("  " + msd.DetailType + ": " + msd.Message);

                Console.WriteLine(  );
            }

            sc.Disconnect(  );

            Console.WriteLine(Environment.NewLine + "Press any key to continue.");
            Console.ReadKey(  );
        }
    }
Partial results are shown in Figure 19-17. Figure 19-17. Results for monitoring replication example The RMO classes used to manage monitors and access merge session information are described in Tables 19-12 and 19-13.
19.1.17. Business Logic HandlersYou can execute business logic in managed code assemblies during the merge synchronization process to provide custom handling for conditions during synchronization, such as data changes, conflicts, and errors. These assemblies are called business logic handlers . You can use COM-based resolverseither custom or those supplied with SQL Server 2005for the same purpose. The RMO classes used to manage business logic handlers and COM-based resolvers are described in Table 19-14.
For more information about implementing custom business logic using business logic handlers or COM-based resolvers, see Microsoft SQL Server 2005 Books Online. |
 Ajax toolkit
Ajax tutorials