 Debugger script
Dhtml css
In HTML, the ALIGN attribute is used to align elements and images and to float images. In HTML 4, however, the ALIGN attribute is deprecated in favor of using styles to achieve similar or superior results.
The ALIGN attribute is used with the heading elements and the P element to center or right-align element content. The same result can be achieved using the text-align property. Use the text-align property to center the content of the H1 element:
h1 { color: blue; background: transparent; font-size: 42px;
font-family: Arial, Geneva, Helvetica, sans-serif;
text-align: center; }
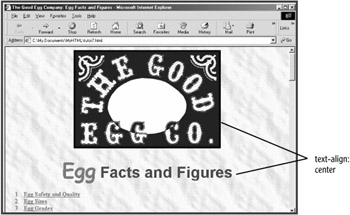
Next, add a class="banner" attribute to the paragraph in which the banner image is nested, and then use a class selector to center the banner image (see Figure 8.9):
p.banner { text-align: center; }
</style>
</head>
<body>
<p class="banner"><img src="goodegg.gif" width="400"
height="267" alt="The Good Egg Company banner image"></p>

It is important to note that the text-align property does not horizontally align the element to which it is applied, but only that element's contents (such as its text or an image). A different procedure must be followed to center or right-align an element, which will be covered later in this session, in "Controlling Margins, Padding, and Borders."
The ALIGN attribute is also used in HTML to float an image at the left or right margin, with following text and elements flowing around the image. The HSPACE attribute is used to add horizontal spacing to the left and right of a floating image, but is also deprecated in HTML 4. In CSS, you can use the float property to float an image on the left or right margin, and you can use the margin-right or margin-left property to add horizontal spacing to the right or left of a floating image.
First add an inline image to the document, with a class attribute added so styles can be applied only to it and other images belonging to that class:
<p><img class="leftfloat" src="safety.gif" width="225"
height="150" alt="Safety First">To further reduce the risk of
infection from Salmonella from eggs, you can cook your eggs
until the whites are no longer runny, which should kill any
Salmonella microorganisms that are present.
Next, add a style rule using a class selector that will float images belonging to the "leftfloat" class and will set a ten-pixel right margin, to separate the image from the flowing text (see Figure 8.10):
p.banner { text-align: center; }
img.leftfloat { float: left; margin-right: 10px; }
First add an inline image to the document, with a class attribute added so styles can be applied only to it and other images belonging to that class:
<p><img class="rightfloat" src="quality.gif" hspace="5"
width="225" height="150" alt="Top Quality">Children, the
elderly, and individuals in ill-health are more vulnerable to
developing complications from Salmonella infection than is
the case with healthy adults.
Next, add a style rule using a class selector that will float images belonging to the "rightfloat" class and will set a five-pixel right margin to separate the image from the flowing text (see Figure 8.11):
img.leftfloat { float: left; margin-right: 10px; }
img.rightfloat { float: right; margin-left: 5px; }

Unlike when using HTML's ALIGN attribute to float images, you can use the float property to also float other elements. For an element to be floated, however, its width needs to be set to less than 100 percent. Later in this session, in "Controlling Margins, Padding, and Borders," you will also learn how to create a drop-cap effect by setting a width for a SPAN element and then floating it.
In HTML, the BR element's CLEAR attribute is used to cause following text to clear a floating image. The CLEAR attribute is also deprecated in HTML 4. In CSS, you can use the clear property to cause an element to clear a floating image. For this example, you will be creating an inline style, which applies style properties directly to an element using the STYLE attribute (rather than creating an embedded style using the STYLE element). Inline styles work exactly the same way that embedded styles work, except they are quoted. They also only affect the element in which they are inserted. They can be useful when you only need an effect in a single place.
To the H3 element following the right-floating image you just added, insert an inline style that causes the element to clear a right-floating image (see Figure 8.12):
<h3 style="clear: right"><a name="bloodspots"></a>Blood Spots
and Chalaza</h3>
<p>Blood spots in eggs are caused when blood vessels rupture
on the surface of the yolk when the egg is being formed.
[...]
The clear property can take the following values: left, right, both, and none (the default). This differs slightly from the CLEAR attribute, which takes a value of all (instead of both) to cause following text to break past both a left-floating and a right-floating image.
 Debugger script
Dhtml css