 Debugger script
Dhtml css
You can use the INPUT element to create two additional (and essential) input controls: a submit button and a reset button. A submit button, as its name implies, submits the form's data to the form processing agent (usually a CGI script) specified by the FORM element's ACTION attribute. A reset button lets visitors reset the form, clearing any previous entries. Add submit and reset buttons to your form (see Figure 7.11):
<p><input type="submit" value="Submit Form">  <input type="reset" value="Reset Form"></p> </form>
The type="submit" and type="reset" attributes specify that the submit button and reset button input controls are being created. The VALUE attribute specifies the label that is to be displayed on the buttons. Two non-breaking spaces are inserted to create more space between the buttons.
Rather than using the default gray submit button, you can use an image as a submit button. I've included a sample submit button image with the example files that you can use. To add an image submit button to your form, just enter the following (see Figure 7.12):
<p><input type="image" src="submit.gif" alt="Submit Form"
border="0"></p>
</form>
In this case, the type="image" attribute specifies that the input control is an image button. It is a good idea to include an ALT attribute to alert users who are unable to view the submit button image, such as users using a text-only or a Braille browser. The BORDER attribute turns off the display of the border around the image. You can only create a submit button using an image using this method, so if you choose to use this method, you'll only be able to include a submit button as an image—not a reset button.
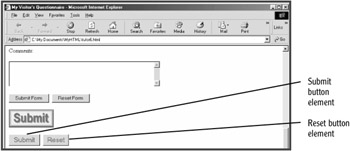
HTML 4 includes a new element, the BUTTON element, that potentially provides more versatility when creating submit and reset buttons. Add submit and reset button elements (see Figure 7.13):
<p><button type="submit" name="submit" value="submit"> <font size="4" color="green">Submit</font> </button>   <button type="reset" name="reset"> <font size="4" color="red">Reset</font> </button></p> </form>

The type="submit" and type="reset" attributes specify whether the button is a submit button or a reset button. A type="button" attribute can also be used, which will create a push button; by themselves, push buttons have no default behavior, but can have behaviors associated with them using JavaScript or other client-side scripting languages.
| Caution |
The primary problem with using the BUTTON element is that older browsers that predate HTML 4 do not support it.Those browsers' users will then not be able to submit the form data, because they won't be able to see the submit button. For that reason, most Web authors stick to using the INPUT element to create submit and reset buttons for forms. |
 Debugger script
Dhtml css