 Debugger script
Dhtml css
You create a two-row frame page in exactly the same way as a two-column frame page, except that you use the ROWS attribute in the FRAMESET tag instead of the COLS attribute.
Open a new blank window in your text editor and type a DocType declaration for the document, followed by the starting HTML, HEAD, and TITLE elements:
Define a two-row layout, with a "topbar" row set at 80 pixels in height and a "main" row set to expand or contract with the height of the browser's view-port (you'll be creating topbar.html in the next section):
<head>
<title>Two-Column Frame Layout Example</title>
</head>
<frameset rows="80, *">
   <frame src="topbar.html" name="topbar" scrolling="no"
noresize>
   <frame src="front.html" name="main">
</frameset>
</html>
You'll notice in this example that both scrolling="no" and noresize have been set in the "topbar" frame. When you have a thin frame, sometimes the space added below a block element (such as a paragraph or level-one heading tag) causes the scroll bars to be displayed, even though the text is entirely visible within the frame. Turning off scrolling ensures that the scroll bars are not displayed. The NORESIZE attribute simply ensures that a viewer of the page cannot manually resize the dimensions of the frame.
Save the example page as fs_tworows.html in the frames folder in your MyHTML folder.
Next, you need to create the page—topbar.html—that will be displayed in the top-row frame. To get started creating the top bar menu:
Open the example file, topbar_example.html, from the frames folder in your MyHTML folder.
Save the example file as topbar.html in the same folder.
Add a link menu to the top bar page that controls the content of the main frame:
<table> <tr><td width="125"> <h3><font face="Arial, Geneva, Helvetica, sans- serif">Contents:</font></h3> </td><td> <p>[<a href="coleridge.html" target="main">Coleridge</a>]  [<a href="byron.html" target="main">Byron</a>]  [<a href="wordsworth.html" target="main">Wordsworth</a>]  [<a href="shelley.html" target="main">Shelley</a>]  [<a href="keats.html" target="main">Keats</a>]  [<a href="tennyson.html" target="main">Tennyson</a>]  [<a href="rbrowning.html" target="main">R. Browning</a>]  [<a href="ebrowning.html" target="main">E. Browning</a>]  [<a href="bronte.html" target="main">E. Bronte</a>]  [<a href="front.html" target="main">Go to Front</a>]</p> </td></tr> </table>
As with the sidebar menu in the two-column frame page example, you'll notice in this example that the target="main" attribute causes the objects of the links to be displayed in the "main" frame (which is the lower-row frame in this example frameset). For this to work, the FRAME element in the frameset page must include name="main". These must match exactly—if you've got "main" in one place, but "Main" in the other, the links won't work. Note also that non-breaking spaces ( ) are used in this example to allow the display of double spaces between links and to prevent line breaks from occurring inside of a link.
The front page and other main content pages that will be displayed in the "main" frame are the same pages that were utilized in the two-column layout example and have already been created for you. Test the example:
Save topbar.html in your text editor and then run your browser and open fs_tworows.html from the frames folder in your MyHTML folder (see Figure 6.7).
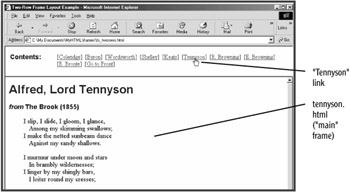
Click on the sixth link ("Tennyson") in the top bar menu. The example file, tennyson.html, is displayed in the "main" frame (see Figure 6.8).

Figure 6.8: Clicking on the "Tennyson" link in the sidebar menu causes the Tennyson page to be displayed in the "main" frame.
Click on the "Go to Front" link to redisplay the front page, front.html, in the "main" frame.
 Debugger script
Dhtml css