 Javascript validator
Javascripts
|
|
14.2 Custom ControlsIn addition to creating user controls, which are essentially reusable small web pages, you can also create your own compiled custom controls. There are three ways to create custom controls:
Composite controls are most similar to user controls. The key difference is that composite controls are compiled into a DLL and used as you would any server control. To get started, you'll create a Web Control Library in which you'll create the various custom controls for this chapter. Open Visual Studio .NET and choose New Project. In the New Project Window, select either Visual C# Projects or Visual Basic Projects and create a Web Control Library called CustomControls, as shown in Figure 14-7. Figure 14-7. Custom control New Project window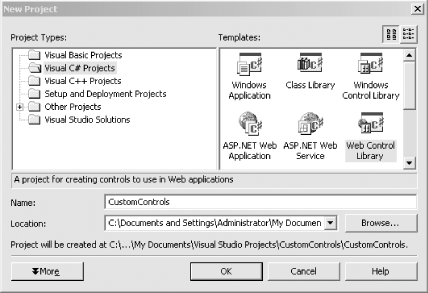 You'll notice that Visual Studio has created a complete custom control named WebCustomControl1. Before examining this control, create a Web Application to test it. From the File menu choose New Project (Ctrl-Shift-N) and create a project named CustomControlWebPage in the same directory. Be sure to choose the "Add to Solution" radio button, as shown in Figure 14-8. Figure 14-8. Add custom control web page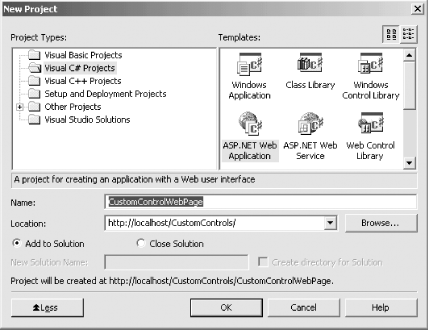 You'll create a series of custom controls and test them from this application. Right-click on the CustomControls project to bring up the context menu. First click on Set as Startup Project, and then choose Properties, as shown in Figure 14-9. Figure 14-9. Choosing project properties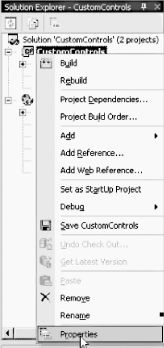 Choose the configuration properties and set the output path to the same directory as the test page, as shown in Figure 14-10. Figure 14-10. Setting the output path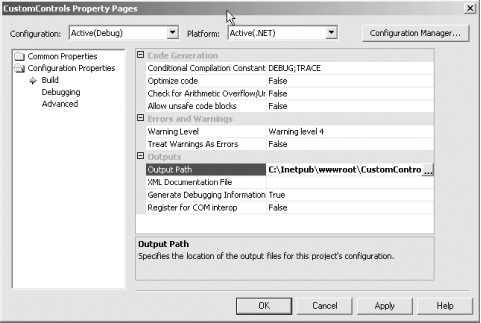 Normally, when you build a custom control you will copy the .dll file to the \bin directory of the page that will test it. By setting the output to the \bin directory of your test page you will save that step and thus be able to test the control quickly. 14.2.1 The Default (Full) Custom ControlVisual Studio .NET has provided a custom control named WebCustomControl1, as we saw. This is a full custom control, derived from System.Web.UI.WebControls.WebControl. Even before you fully understand how this code works, you can test it in the test page you created. Open WebForm1.aspx and add a statement to register the new control: <%@Register TagPrefix="OReilly" Namespace="CustomControls" Assembly="CustomControls" %> This registers the custom control with the web page, similar to how you registered the user control in Example 14-3. Once again you use the @Register tag and provide a tag prefix (OReilly). Rather than providing a Tagname and src, however, you provide a Namespace and Assembly, which uniquely identify the control and the DLL that the page must use. You now add the control to the page. The two attributes you must set are the Runat attribute, which is needed for all server-side controls, and the Text attribute, which dictates how the control is displayed at runtime. The tag should appear as follows: <OReilly:WebCustomControl1 Runat="Server" Text="Hello World!" Id="WC1" /> When you view this page, the text you passed in is displayed, as shown in Figure 14-11. Figure 14-11. Viewing the default custom control Example 14-8 shows the C# version of the complete custom control provided by Visual Studio .NET, while Example 14-10 shows the VB.NET version. Example 14-8. VS.NET default custom control (C#)using System;
using System.Web.UI;
using System.Web.UI.WebControls;
using System.ComponentModel;
namespace CustomControls
{
[DefaultProperty("Text"),
ToolboxData("<{0}:WebCustomControl1
runat=server></{0}:WebCustomControl1>")]
public class WebCustomControl1 : System.Web.UI.WebControls.WebControl
{
private string text;
[Bindable(true),
Category("Appearance"),
DefaultValue("")]
public string Text
{
get
{
return text;
}
set
{
text = value;
}
}
protected override void Render(HtmlTextWriter output)
{
output.Write(Text);
}
}
}
Example 14-9. VB.NET default custom controlImports System.ComponentModel
Imports System.Web.UI
<DefaultProperty("Text"), ToolboxData("<{0}:WebCustomControl1
runat=server></{0}:
WebCustomControl1>")> Public Class WebCustomControl1
Inherits System.Web.UI.WebControls.WebControl
Dim text As String
<Bindable(True), Category("Appearance"), DefaultValue("")> Property [Text]( ) As String
Get
Return text
End Get
Set(ByVal Value As String)
text = Value
End Set
End Property
Protected Overrides Sub Render(ByVal output As System.Web.UI.HtmlTextWriter)
output.Write([Text])
End Sub
End Class
This control contains a single property, Text, backed by a private string variable, text. Note that there are attributes provided both for the property and for the class. These attributes are used by Visual Studio .NET and are not required when creating custom controls. The most common attributes for custom controls are shown in Table 14-2.
14.2.1.1 PropertiesCustom controls can expose properties just as any other class can. You access these properties either programmatically (e.g., in code-behind) or declaratively, by setting attributes of the custom control, as you did in the text page, and as shown here: <OReilly:WebCustomControl1 Runat="Server" Text="Hello World!" /> The Text property of the control is accessed through the Text attribute in the web page. In the case of the Text property and the Text attribute, the mapping between the attribute and the underlying property is straightforward because both are strings. ASP.NET will provide intelligent conversion of other types, however. For example, if the underlying type is an integer or a long, the attribute will be converted to the appropriate value type. If the value is an enumeration, ASP.NET matches the string value against the evaluation name and sets the correct enumeration value. If the value is a Boolean, ASP.NET matches the string value against the Boolean value; that is, it will match the string "True" to the Boolean value true. 14.2.1.2 The Render methodThe key method of the custom control is Render. This method is declared in the base class, and must be overridden in your derived class if you wish to take control of rendering to the page. In Example 14-9 and Example 14-10, the Render method uses the HtmlTextWriter object passed in as a parameter to write the string held in the Text property. The HtmlTextWriter class derives from TextWriter and provides rich formatting capabilities. HtmlTextWriter will ensure that the elements produced are well-formed, and it will manage the attributes, including style attributes. Thus, if you want to set the text to red, you can add a color attribute, passing in an enumerated color object that you've translated to HTML, as shown here: output.AddStyleAttribute("color", ColorTranslator.ToHtml(Color.Red));
In order for the line of code to work, you will need to add an alias to the System.Drawing namespace with either a using statement (in C#) or an imports statement (in VB .NET) at the top of the source code. You can set the text to be within header (<h2>) tags with the HtmlTextWriter's RenderBeginTag and RenderEndTag methods: output.RenderBeginTag("h2");
output.Write(Text);
output.RenderEndTag( );
The result is that when the text is output, the correct tags are created, as shown in Figure 14-12. (The source output that illustrates the HTML rendered by the HtmlTextWriter is circled and highlighted.) Figure 14-12. The output and its source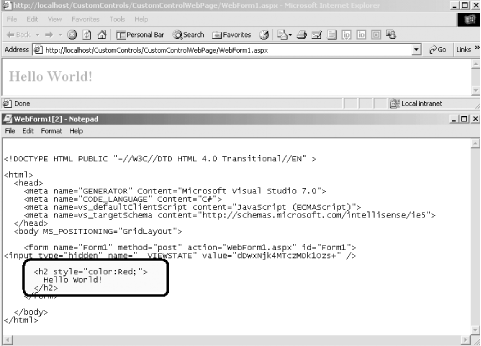 14.2.1.3 Maintaining stateIn the next example, you'll add a button to increase the size of the text. To accomplish this, you'll eschew the rendering support of the HtmlTextWriter, instead writing the text yourself, using a new Size property (to set the size of the output text). The C# code for the Render method should appear as follows: protected override void Render(HtmlTextWriter output)
{
output.Write("<font size = " + Size + ">" + Text + "</font>");
}
The VB.NET code should appear as: Protected Overrides Sub Render(ByVal output As _
System.Web.UI.HtmlTextWriter)
output.Write("<font size = " & Size & ">" & [Text] & "</font>")
End Sub
The Size property must maintain its state through the postback fired by pressing the button. This is as simple as writing to and reading from the ViewState collection maintained by the page (see Chapter 6), as shown in the C# property definition of the Size property: public int Size
{
get { return Convert.ToInt32(ViewState["Size"]); }
set { ViewState["Size"] = value.ToString( ); }
}
In VB.NET, the Size property is defined as follows: Public Property Size( ) As Integer
Get
Return Convert.ToInt32(ViewState("Size"))
End Get
Set(ByVal Value As Integer)
ViewState("Size") = Value.ToString( )
End Set
End Property
The property Get method retrieves the value from ViewState, casts it to a string in the case of C#, and then converts that string to its integer equivalent. The property Set method stashes a string representing the size into ViewState. To ensure that a valid value is in ViewState to start with, you'll also add a constructor to this control. In C#, the constructor is: public WebCustomControl1( )
{
ViewState["Size"] = "1";
}
In VB.NET, it is: Public Sub New( )
ViewState("Size") = "1"
End Sub
The constructor initializes the value held in ViewState to 1. Each press of the button will update the Size property. To make this work, you'll add a button declaration in the test page: <asp:Button Runat="server" Text="Increase Size" OnClick="Button1_Click" id="Button1" /> The important changes here are that you've added an ID attribute (Button1) and defined an event handler for the button. You will also need to create an event handler in the code-behind page. Be sure to add a reference to the CustomControls DLL file to the web page. That will allow Intellisense to see your object, and you'll be able to declare the control in the code-behind page. In C#, this takes the form: public class WebForm1 : System.Web.UI.Page
{
protected System.Web.UI.WebControls.Button Button1;
protected CustomControls.WebCustomControl1 WC1;
In VB.NET, it takes the form: Public Class WebForm1 Inherits System.Web.UI.Page Protected WithEvents Button1 As System.Web.UI.WebControls.Button Protected WC1 As VBCustomControls.WebCustomControl1 You can then use that declaration to set the Size property in the event handler in C# for the button click: public void Button1_Click(object sender, System.EventArgs e)
{
WC1.Size += 1;
}
The VB.NET code is nearly identical: Public Sub Button1_Click(ByVal sender As Object, _
ByVal e As System.EventArgs) Handles Button1.Click
WC1.Size += 1
End Sub
Example 14-10 is the complete .aspx page for testing, Example 14-11 is the complete C# code-behind page (with the Visual Studio .NET generated code removed to save space), and Example 14-12 is the complete C# source for the custom control. Example 14-13 is the complete VB.NET code-behind page (again, with the Visual Studio .NET-generated code removed to save space), and Example 14-14 provides the complete VB.NET source for the custom control. Example 14-10. WebForm1.aspx<%@ Page language="c#"
Codebehind="WebForm1.aspx.cs"
AutoEventWireup="false"
Inherits="CustomControlWebPage.WebForm1" %>
<%@ Register TagPrefix="OReilly"
Namespace="CustomControls"
Assembly="CustomControls" %>
<!DOCTYPE HTML PUBLIC "-//W3C//DTD HTML 4.0 Transitional//EN" >
<HTML>
<HEAD>
</HEAD>
<body MS_POSITIONING="GridLayout">
<form id=Form1 method=post runat="server">
<asp:Button Runat="server"
Text="Increase Size"
OnClick="Button1_Click"
id="Button1" />
<OReilly:WebCustomControl1
Runat="Server"
Text="Hello World!"
id="WC1" />
</FORM>
</body>
</HTML>
Example 14-11. WebForm1.aspx.csusing System;
using System.Collections;
using System.ComponentModel;
using System.Data;
using System.Drawing;
using System.Web;
using System.Web.SessionState;
using System.Web.UI;
using System.Web.UI.WebControls;
using System.Web.UI.HtmlControls;
namespace CustomControlWebPage
{
public class WebForm1 : System.Web.UI.Page
{
protected System.Web.UI.WebControls.Button Button1;
protected CustomControls.WebCustomControl1 WC1;
public WebForm1( )
{
Page.Init += new System.EventHandler(Page_Init);
}
// ASP.NET generated code elided from listing
private void InitializeComponent( )
{
this.Button1.Click += new System.EventHandler(this.Button1_Click);
this.Load += new System.EventHandler(this.Page_Load);
}
public void Button1_Click(object sender, System.EventArgs e)
{
WC1.Size += 1;
}
}
}
Example 14-12. WebCustomControl1.csusing System;
using System.Web.UI;
using System.Web.UI.WebControls;
using System.ComponentModel;
namespace CustomControls
{
[DefaultProperty("Text"),
ToolboxData("<{0}:WebCustomControl1
runat=server></{0}:WebCustomControl1>")]
public class WebCustomControl1 : System.Web.UI.WebControls.WebControl
{
private string text;
// constructor initializes the value in ViewState
public WebCustomControl1( )
{
ViewState["Size"] = "1";
}
// Created by VS.NET
[Bindable(true),
Category("Appearance"),
DefaultValue("")]
public string Text
{
get { return text; }
set{ text = value; }
}
// Your custom attribute to hold the Size in ViewState
public int Size
{
get { return Convert.ToInt32(ViewState["Size"]); }
set { ViewState["Size"] = value.ToString( ); }
}
// Render method handler renders the size
protected override void Render(HtmlTextWriter output)
{
   output.Write("<font size = " + Size + ">" + Text + "</font>");
}
}
}
Example 14-13. WebForm1.aspx.vbImports CustomControls.WebCustomControl1
Public Class WebForm1
Inherits System.Web.UI.Page
Protected WithEvents Button1 As System.Web.UI.WebControls.Button
Protected WC1 As VBCustomControls.WebCustomControl1
Public Sub Button1_Click(ByVal sender As Object, _
ByVal e As System.EventArgs) _
Handles Button1.Click
WC1.Size += 1
End Sub
End Class
Example 14-14. WebCustomControl1.vbImports System.ComponentModel
Imports System.Web.UI
Imports System.Drawing
<DefaultProperty("Text"), ToolboxData("<{0}:WebCustomControl1 _
runat=server></{0}:WebCustomControl1>")> _
Public Class WebCustomControl1
Inherits System.Web.UI.WebControls.WebControl
Dim _text As String
Public Sub WebCustomControl1( )
ViewState("Size") = "1"
End Sub
<Bindable(True), Category("Appearance"), DefaultValue("")> _
Property [Text]( ) As String
Get
Return _text
End Get
Set(ByVal Value As String)
_text = Value
End Set
End Property
Protected Overrides Sub Render( _
ByVal output As System.Web.UI.HtmlTextWriter)
output.Write("<font size = " & Size & ">" & [Text] & "</font>")
End Sub
Public Property Size(  ) As Integer
   Get
      Return Convert.ToInt32(ViewState("Size"))
   End Get
   Set(ByVal Value As Integer)
      ViewState("Size") = Value.ToString(  )
   End Set
End Property
End Class
To illustrate the effect of clicking the button, in Figure 14-13 we created two instances of the program, and in the second instance we pressed the button three times. Figure 14-13. Maintaining state Each time the button is clicked, the state variable Size is incremented; when the page is drawn, the state variable is retrieved and used to set the size of the text. 14.2.2 Creating Derived ControlsThere are times when it is not necessary to create your own control from scratch. You may simply want to extend the behavior of an existing control type. You can derive from an existing control just as you might derive from any class. Imagine, for example, that you would like a button to maintain a count of the number of times it has been clicked. Such a button might be useful in any number of applications, but unfortunately the web Button control does not provide this functionality. To overcome this limitation of the button class, you'll derive a new custom control from System.Web.UI.WebControls.Button, as shown in Example 14-15 (for C#) and Example 14-16 (for VB.NET). Example 14-15. CountedButton implementation in C#using System;
using System.Web.UI;
using System.Web.UI.WebControls;
using System.ComponentModel;
namespace CustomControls
{
// custom control derives from button
public class CountedButton : System.Web.UI.WebControls.Button
{
// constructor initializes view state value
public CountedButton( )
{
this.Text = "Click me";
ViewState["Count"] = 0;
}
// count as property maintained in view state
public int Count
{
get
{
return (int) ViewState["Count"];
}
set
{
ViewState["Count"] = value;
}
}
// override the OnClick to increment the count,
// update the button text and then invoke the base method
protected override void OnClick(EventArgs e)
{
ViewState["Count"] = ((int)ViewState["Count"]) + 1;
this.Text = ViewState["Count"] + " clicks";
base.OnClick(e);
}
}
}
Example 14-16. CountedButton implementation in VB.NETImports System.ComponentModel
Imports System.Web.UI
Imports System.Web.UI.WebControls
' custom control derives from button
Public Class CountedButton
   Inherits System.Web.UI.WebControls.Button
' constructor initializes view state value
Public Sub New( )
Me.Text = "Click me"
ViewState("Count") = 0
End Sub
' count as property maintained in view state
Public Property Count(  ) As Integer
   Get
      Return CInt(ViewState("Count"))
   End Get
   Set(ByVal Value As Integer)
      ViewState("Count") = Value
   End Set
End Property
' override the OnClick to increment the count,
' update the button text and then invoke the base method
Protected Overrides Sub OnClick(ByVal e As EventArgs)
   ViewState("Count") = CInt(ViewState("Count")) + 1
   Me.Text = ViewState("Count") & " clicks"
   MyBase.OnClick(e)
End Sub
End Class
You begin by deriving your new class from the existing Button type: public class CountedButton : System.Web.UI.WebControls.Button The VB.NET equivalent is: Public Class CountedButton Inherits System.Web.UI.WebControls.Button The work of this class is to maintain its state: how many times the button has been clicked. You provide a public property, Count, which is backed not by a private member variable but rather by a value stored in view state. This is necessary because the button will post the page, and the state would otherwise be lost. The Count property is defined as follows in C#: public int Count
{
get
{
return (int) ViewState["Count"];
}
set
{
ViewState["Count"] = value;
}
}
It is defined as follows in VB.NET: Public Property Count( ) As Integer
Get
Return CInt(ViewState("Count"))
End Get
Set(ByVal Value As Integer)
ViewState("Count") = Value
End Set
End Property
To retrieve the value "Count" from view state, you use the string Count as an offset into the ViewState collection. What is returned is an object that you cast to an int in C# or an Integer in VB.NET. To ensure that the property will return a valid value, you initialize the Count property in the constructor, where you also set the initial text for the button. The constructor in C# is: public CountedButton( )
{
this.Text = "Click me";
ViewState["Count"] = 0;
}
In VB.NET, it appears as follows: Public Sub New( )
Me.Text = "Click me"
ViewState("Count") = 0
End Sub
Because CountedButton derives from Button, it is easy to override the behavior of a Click event. In this case, when the user clicks the button, you will increment the Count value held in view state and update the text on the button to reflect the new count. You will then call the base class' OnClick method to carry on with the normal processing of the Click event. The C# event handler is as follows: protected override void OnClick(EventArgs e)
{
ViewState["Count"] = ((int)ViewState["Count"]) + 1;
this.Text = ViewState["Count"] + " clicks";
base.OnClick(e);
}
While the source code for the VB.NET Click event handler is: Protected Overrides Sub OnClick(ByVal e As EventArgs)
ViewState("Count") = CInt(ViewState("Count")) + 1
Me.Text = ViewState("Count") & " clicks"
MyBase.OnClick(e)
End Sub
You add this control to the .aspx form just as you would your composite control: <OReilly:CountedButton Runat="Server" id="CB1" /> You do not need to add an additional Register statement because this control, like the custom control, is in the CustomControls namespace and the CustomControls assembly. When you click the button four times, the button reflects the current count of clicks, as shown in Figure 14-14. Figure 14-14. Counted button 14.2.3 Creating Composite ControlsThe third way to create a custom control is to combine two or more existing controls. In the next example, you will act as a contract programmer, and we will act as the client. We'd like you to build a slightly more complex control that we might use to keep track of the number of inquiries we receive about our books. As your potential client, we might ask you to write a control that lets us put in one or more books, and each time we click on a book the control will keep track of the number of clicks for that book, as shown in Figure 14-15. Figure 14-15. Composite control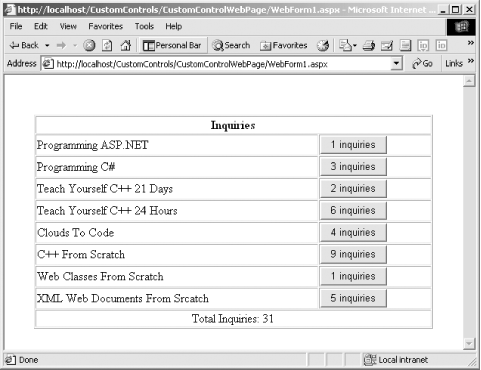 The .aspx file for this program is shown in Chapter 14. Its C# and VB versions are identical, except for the @ Page directive. Example 14-17. The .aspx file for the composite control<%@ Page language="c#" Codebehind="WebForm1.aspx.cs" AutoEventWireup="false" Inherits="CustomControlWebPage.WebForm1" %> <%@ Register TagPrefix="OReilly" Namespace="CustomControls" Assembly="CustomControls" %> <!DOCTYPE HTML PUBLIC "-//W3C//DTD HTML 4.0 Transitional//EN" > <HTML> <HEAD> <meta content="Microsoft Visual Studio 7.0" name=GENERATOR> <meta content=C# name=CODE_LANGUAGE> <meta content="JavaScript (ECMAScript)" name=vs_defaultClientScript> <meta content=http://schemas.microsoft.com/intellisense/ie5 name=vs_targetSchema> </HEAD> <body MS_POSITIONING="GridLayout"> <form id=Form1 method=post runat="server"> <OReilly:BookInquiryList Runat="Server" id="bookInquiry1"> <OReilly:BookCounter Runat="server" BookName="Programming ASP.NET" ID="Bookcounter1"/> <OReilly:BookCounter Runat="server" BookName="Programming C#" ID="Bookcounter2" /> <OReilly:BookCounter Runat="server" BookName="Teach Yourself C++ 21 Days" ID="BookCounter3" /> <OReilly:BookCounter Runat="server" BookName="Teach Yourself C++ 24 Hours" ID="Bookcounter4" /> <OReilly:BookCounter Runat="server" BookName="Clouds To Code" ID="Bookcounter5" /> <OReilly:BookCounter Runat="server" BookName="C++ From Scratch" ID="Bookcounter6" /> <OReilly:BookCounter Runat="server" BookName="Web Classes From Scratch" ID="Bookcounter7" /> <OReilly:BookCounter Runat="server" BookName="XML Web Documents From Srcatch" ID="Bookcounter8" /> </OReilly:BookInquiryList> </FORM> </body> </HTML> The key thing to note in this code is that the BookInquiryList component contains a number of BookCounter elements. There is one BookCounter element for each book we want to track in the control. The control is quite flexible. We can track one, eight (as shown here), or any arbitrary number of books. Each BookCounter element has a BookName attribute that is used to display the name of the book being tracked. You can see from Figure 14-15 that each book is tracked using a CountedButton custom control, but you do not see a declaration of the CountedButton in the .aspx file. The CountedButton control is entirely encapsulated within the BookCounter custom control. The entire architecture, therefore, is as follows:
The BookInquiryList object has only two purposes: it acts as a container for the BookCounter objects, and it is responsible for rendering itself and ensuring that it's contained BookCounter objects render themselves on demand. The best way to see how all this works is to work your way through the code from the inside out. The most contained object is the CountedButton. 14.2.3.1 Modifying the CountedButton derived controlCountedButton needs only minor modification, as shown in Example 14-18 for C# and Example 14-19 for VB.NET. Example 14-18. The modified CountedButton.cs fileusing System;
using System.Web.UI;
using System.Web.UI.WebControls;
using System.ComponentModel;
namespace CustomControls
{
// custom control derives from button
public class CountedButton : System.Web.UI.WebControls.Button
{
private string displayString;
// default constructor
public CountedButton(  )
{
   displayString = "clicks";
   InitValues(  );
}
// overloaded, takes string to display (e.g., 5 books)
public CountedButton(string displayString)
{
this.displayString = displayString;
InitValues( );
}
// called by constructors
private void InitValues( )
{
if (ViewState["Count"] == null)
ViewState["Count"] = 0;
this.Text = "Click me";
}
// count as property maintained in view state
public int Count
{
get
{
// initialized in constructor
// can not be null
return (int) ViewState["Count"];
}
set
{
ViewState["Count"] = value;
}
}
// override the OnClick to increment the count,
// update the button text and then invoke the base method
protected override void OnClick(EventArgs e)
{
ViewState["Count"] = ((int)ViewState["Count"]) + 1;
this.Text = ViewState["Count"] + " " + displayString;
base.OnClick(e);
}
}
}
Example 14-19. The modified CountedButton.vb fileImports System.ComponentModel
Imports System.Web.UI
Imports System.Web.UI.WebControls
' custom control derives from button
Public Class CountedButton
Inherits System.Web.UI.WebControls.Button
Private displayString As String
' constructor initializes view state value
Public Sub New(  )
   displayString = "clicks"
   Init(  )
End Sub
' overloaded, takes string to display (e.g., 5 books)
Public Sub New(ByVal displayString As String)
Me.displayString = displayString
Init( )
End Sub
' called by constructors
Private Shadows Sub Init( )
If ViewState("Count") = Is Nothing Then
ViewState("Count") = 0
Me.Text = "Click me"
End If
End Sub
' count as property maintained in view state
Public Property Count( ) As Integer
Get
Return CInt(ViewState("Count"))
End Get
Set(ByVal Value As Integer)
ViewState("Count") = Value
End Set
End Property
' override the OnClick to increment the count,
' update the button text and then invoke the base method
Protected Overrides Sub OnClick(ByVal e As EventArgs)
ViewState("Count") = CInt(ViewState("Count")) + 1
Me.Text = CStr(ViewState("Count") & " " & displayString
MyBase.OnClick(e)
End Sub
End Class
Because you want the button to be able to display the string 5 Inquiries rather than 5 clicks, you must change the line within the OnClick method that sets the button's text: this.Text = ViewState["Count"] + " " + displayString; The VB.NET equivalent is: Me.Text = ViewState("Count") & " " & displayString
Rather than hard-wiring the string, you'll use a private member variable, displayString, to store a value passed in to the constructor: private string displayString; In VB.NET, you'd use: Private displayString As String You must set this string in the constructor. To protect client code that already uses the default constructor (with no parameters), you'll overload the constructor, adding a version that takes a string: public CountedButton(string displayString)
{
this.displayString = displayString;
Init( );
}
In VB.NET, the code is: Public Sub New(ByVal displayString As String) Me.displayString = displayString Initialize( ) End Sub You can now modify the default constructor to set the displayString member variable to a reasonable default value. In C#, the code is: public CountedButton( )
{
displayString = "clicks";
InitValues( );
}
In VB.NET, use: Public Sub New( ) displayString = "clicks" Init( ) End Sub The code common to both constructors has been factored out to the private helper method Init, which ensures that the Count property is initialized to zero and sets the initial text for the button: private void Init( )
{
if (ViewState["Count"] == null)
ViewState["Count"] = 0;
this.Text = "Click me";
}
In VB.NET, the same thing is accomplished using: Private Shadows Sub Init( )
If ViewState("Count") = Nothing Then
ViewState("Count") = 0
Me.Text = "Click me"
End If
End Sub
With these changes, the CountedButton is ready to be used in the first composite control, BookCounter. 14.2.3.2 Creating the BookCounter composite controlThe BookCounter composite control is responsible for keeping track of and displaying the number of inquiries about an individual book. Its complete source code is shown in C# in Example 14-20 and in VB.NET in Example 14-21. Example 14-20. BookCounter.csusing System;
using System.Web.UI;
using System.Web.UI.WebControls;
using System.ComponentModel;
namespace CustomControls
{
public class BookCounter :
System.Web.UI.WebControls.WebControl,
INamingContainer
{
// intialize the counted button member
CountedButton btn = new CountedButton("inquiries");
public string BookName
{
get
{
return (string) ViewState["BookName"];
}
set
{
ViewState["BookName"] = value;
}
}
public int Count
{
get
{
return btn.Count;
}
set
{
btn.Count = value;
}
}
public void Reset( )
{
btn.Count = 0;
}
protected override void CreateChildControls(  )
{
   Controls.Add(btn);
}
}
}
Example 14-21. BookCounter.vbImports System
Imports System.Web.UI
Imports System.Web.UI.WebControls
Imports System.ComponentModel
Public Class BookCounter
Inherits System.Web.UI.WebControls.WebControl
Implements INamingContainer
' intialize the counted button member
P btn As CountedButton = New CountedButton("inquiries")
Public Property BookName( ) As String
Get
Return CStr(ViewState("BookName"))
End Get
Set(ByVal Value As String)
ViewState("BookName") = Value
End Set
End Property
Public Property Count( ) As Integer
Get
Return btn.Count
End Get
Set(ByVal Value As Integer)
btn.Count = Value
End Set
End Property
Public Sub Reset( )
btn.Count = 0
End Sub
Protected Overrides Sub CreateChildControls(  )
   Controls.Add(btn)
End Sub
End Class
INamingContainerThe first thing to note about the BookCounter class is that it implements the INamingContainer interface. This is a "marker" interface that has no methods. The purpose of this interface is to identify a container control that creates a new ID namespace, guaranteeing that all child controls have IDs that are unique to the page. 14.2.3.2.2 Containing CountedButtonThe BookCounter class contains an instance of CountedButton: CountedButton btn = new CountedButton("inquiries");
or: Private btn As CountedButton = New CountedButton("inquiries")
The btn member is instantiated in the CreateChildControls method inherited from System.Control: protected override void CreateChildControls( )
{
Controls.Add(btn);
}
The VB.NET equivalent is: Protected Overrides Sub CreateChildControls( ) Controls.Add(btn) End Sub CreateChildControls is called in preparation for rendering and offers the BookCounter class the opportunity to add the btn object as a contained control. There is no need for BookCounter to override the Render method; the only thing it must render is the CountedButton, which can render itself. The default behavior of Render is to render all the child controls, so you need not do anything special to make this work. BookCounter also has two properties: BookName and Count. BookName is a string to be displayed in the control and is managed through ViewState. Its C# source code is: public string BookName
{
get
{
return (string) ViewState["BookName"];
}
set
{
ViewState["BookName"] = value;
}
}
Its VB.NET source code is: Public Property BookName( ) As String
Get
Return CStr(ViewState("BookName"))
End Get
Set(ByVal Value As String)
ViewState("BookName") = Value
End Set
End Property
Count is the count of inquires about this particular book; responsibility for keeping track of this value is delegated to the CountedButton. In C#, the code is: public int Count
{
get
{
return btn.Count;
}
set
{
btn.Count = value;
}
}
In VB.NET, it's: Public Property Count( ) As Integer
Get
Return btn.Count
End Get
Set(ByVal Value As Integer)
btn.Count = Value
End Set
End Property
There is no need to place the value in ViewState, since the button itself is responsible for its own data. 14.2.3.3 Creating the BookInquiryList composite controlEach of the BookCounter objects is contained within the Controls collection of the BookInquiryList. This control has no properties or state. Its only method is Render, as shown in C# in Example 14-22 and in VB.NET in Example 14-23. Example 14-22. BookInquiryList source in C#[ControlBuilderAttribute(typeof(BookCounterBuilder)),ParseChildren(false)]
public class BookInquiryList : System.Web.UI.WebControls.WebControl, INamingContainer
{
protected override void Render(HtmlTextWriter output)
{
int totalInquiries = 0;
BookCounter current;
// Write the header
output.Write("<Table border='1' width='90%' cellpadding='1'" +
"cellspacing='1' align = 'center' >");
output.Write("<TR><TD colspan = '2' align='center'>");
output.Write("<B> Inquiries </B></TD></TR>");
// if you have no contained controls, write the default msg.
if (Controls.Count == 0)
{
output.Write("<TR><TD colspan='2' align='center'>");
output.Write("<B> No books listed </B></TD></TR>");
}
// otherwise render each of the contained controls
else
{
// iterate over the controls colelction and
// display the book name for each
// then tell each contained control to render itself
for (int i = 0; i < Controls.Count; i++)
{
   current = (BookCounter) Controls[i];
   totalInquiries += current.Count;
   output.Write("<TR><TD align='left'>" +
      current.BookName + "</TD>");
   output.RenderBeginTag("TD");
   current.RenderControl(output);
   output.RenderEndTag(  );  // end td
   output.Write("</tr>");
}
output.Write("<TR><TD colspan='2' align='center'> " +
" Total Inquiries: " +
totalInquiries + "</TD></TR>");
}
output.Write("</TABLE>");
}
}
Example 14-23. BookInquiryList source in VB.NETImports System.ComponentModel
Imports System.Web.UI
<ControlBuilder(GetType(BookCounterBuilder)), ParseChildren(False)> _
Public Class BookInquiryList
Inherits System.Web.UI.WebControls.WebControl
Implements INamingContainer
Protected Overrides Sub Render(ByVal output As HtmlTextWriter)
Dim totalInquiries As Integer = 0
' Write the header
output.Write("<Table border='1' width='90%' cellpadding='1'" & _
"cellspacing='1' align = 'center' >")
output.Write("<TR><TD colspan = '2' align='center'>")
output.Write("<B> Inquiries </B></TD></TR>")
' if you have no contained controls, write the default msg.
If Controls.Count = 0 Then
output.Write("<TR><TD colspan='2' align='center'>")
output.Write("<B> No books listed </B></TD></TR>")
' otherwise render each of the contained controls
Else
' iterate over the controls colelction and
' display the book name for each
' then tell each contained control to render itself
Dim current As BookCounter
For Each current In Controls
totalInquiries += current.Count
output.Write("<TR><TD align='left'>" & _
current.BookName + "</TD>")
output.RenderBeginTag("TD")
current.RenderControl(output)
output.RenderEndTag( ) ' end td
output.Write("</tr>")
Next
Dim strTotalInquiries As String
strTotalInquiries = totalInquiries.ToString
output.Write("<TR><TD colspan='2' align='center'> " & _
" Total Inquiries: " & _
CStr(strTotalInquiries) & "</TD></TR>")
End If
output.Write("</TABLE>")
End Sub
End Class
Friend Class BookCounterBuilder
Inherits ControlBuilder
Public Overrides Function GetChildControlType( _
ByVal tagName As String, ByVal attributes As IDictionary) As Type
If tagName = "BookCounter" Then
Dim x As BookCounter
Return x.GetType
Else
Return Nothing
End If
End Function
Public Overrides Sub AppendLiteralString(ByVal s As String)
End Sub
End Class
ControlBuilder and ParseChildren attributesThe BookCounter class must be associated with the BookInquiryClass so ASP.NET can translate the elements in the .aspx page into the appropriate code. This is accomplished using the ControlBuilder attribute: [ControlBuilderAttribute(typeof(BookCounterBuilder)),ParseChildren(false)] The argument to the ControlBuilderAttribute is a Type object that you obtain by passing in BookCounterBuilder, a class you will define to return the type of the BookCounter class given a tag named BookCounter. The code for the BookCounterBuilder is shown in C# in Example 14-24 and in VB.NET in Example 14-25. Example 14-24. C# version of BookCounterBuilderinternal class BookCounterBuilder : ControlBuilder
{
public override Type GetChildControlType(
string tagName, IDictionary attributes)
{
if (tagName == "BookCounter")
return typeof(BookCounter);
else
return null;
}
public override void AppendLiteralString(string s)
{
}
}
Example 14-25. VB.NET version of BookCounterBuilderFriend Class BookCounterBuilder
Inherits ControlBuilder
Public Overrides Function GetChildControlType(_
ByVal tagName As String, ByVal attributes As Idictionary) As Type
If tagName = "BookCounter" Then
Dim x As BookCounter
Return x.GetType
Else
Return Nothing
End If
End Function
Public Overrides Sub AppendLiteralString(ByVal s As String)
End Sub
End Class
ASP.NET will use this BookCounterBuilder, which derives from ControlBuilder, to determine the type of the object indicated by the BookCounter tag. Through this association, each of the BookCounter objects will be instantiated and added to the Controls collection of the BookInquiryClass. The second attribute, ParseChildren, must be set to false to tell ASP.NET that you have handled the children attributes and no further parsing is required. A value of false indicates that the nested child attributes are not properties of the outer object, but rather are child controls. RenderThe only method of the BookInquiryClass is the override of Render. The purpose of Render is to draw the table shown earlier in Figure 14-15, using the data managed by each of the BookCounter child controls. The BookInquiryClass provides a count of the total number of inquiries, as shown in Figure 14-16. Figure 14-16. Total inquiries displayed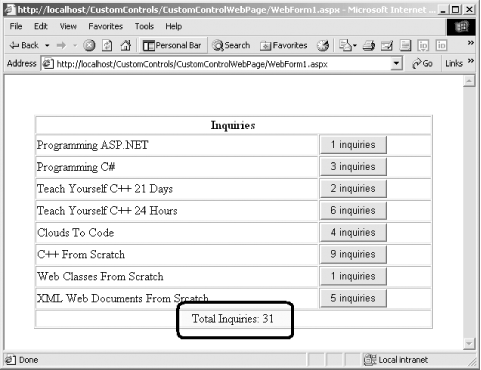 The code tallies inquiries by initializing an integer variable, totalInquiries, to zero and then iterating over each control in turn, asking the control for its Count property. The statement is the same in C# and VB.NET, except for the closing semicolon in C#: totalInquiries += current.Count; The Count property of the control delegates to the CountedButton's count property, as you can see if you step through this code in a debugger, as illustrated in Figure 14-17. Figure 14-17. Stepping into BookCounter.Count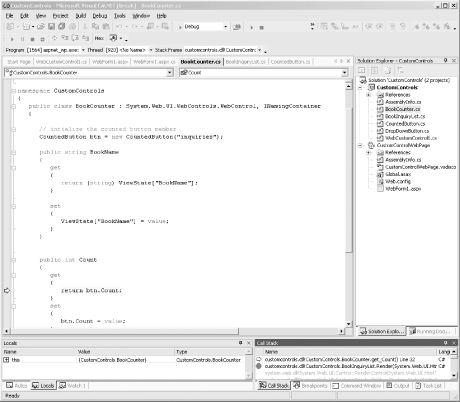 14.2.3.3.3 Rendering the outputThat same loop renders each of the child controls by iterating over each of the controls. In C#, this is done using: for (int i = 0; i < Controls.Count; i++)
{
current = (BookCounter) Controls[i];
totalInquiries += current.Count;
output.Write("<TR><TD align='left'>" +
   current.BookName + "</TD>");
output.RenderBeginTag("TD");
 current.RenderControl(output);
 output.RenderEndTag(  );  // end td
 output.Write("</tr>");
}
In VB.NET, the code is: For Each current in Controls
totalInquiries += current.Count
output.Write("<TR><TD align='left'>" & _
current.BookName + "</TD>")
output.RenderBeginTag("TD")
current.RenderControl(output)
output.RenderEndTag( ) ' end td
output.Write("</tr>")
Next
The local BookCounter object, current, is assigned to each object in the Controls collection in succession: for (int i = 0; i < Controls.Count; i++)
{
current = (BookCounter) Controls[i];
With that object, you are able to get the Count, as described previously: totalInquiries += current.Count; Then you proceed to render the object. The HtmlTextWriter is used first to create a row and to display the name of the book, using the BookName property of the current BookCounter object: output.Write("<TR><TD align='left'>" +
current.BookName + "</TD>");
You then render a TD tag, and within that tag you tell the BookCounter object to render itself. Finally, you render an ending TD tag using RenderEndTag, and an ending row tag using the Write method of the HTMLTextWriter: output.RenderBeginTag("TD");
current.RenderControl(output);
output.RenderEndTag( ); // end td
output.Write("</tr>");
You tell the contained control to render itself: current.RenderControl(output); When you do this, the Render method of BookCounter is called. Since you have not overridden this method, the Render method of the base class is called, which tells each contained object to render itself. The only contained object is CountedButton. Since you have not overridden Render in CountedButton, the base Render method in Button is called, and the button is rendered.
14.2.3.3.4 Rendering the summaryOnce all of the child controls have been rendered, the BookInquiryList creates a new row to display the total inquiries: output.Write("<TR><TD colspan='2' align='center'> " +
" Total Inquiries: " +
totalInquiries + "</TD></TR>");
|
|
|
 Javascript validator
Javascripts